Key Points
- Cleaning your cat’s ears is part of being a cat parent; if you’re uncomfortable doing this, visit an animal groomer or talk to your veterinarian.
- A cat ear cleaning solution, cotton pads, and some gentle massaging are all that’s needed to keep your cat’s ears sparkling.
- Some ear issues should be handled by your vet and not treated at home.
As a cat owner, you have a lot of responsibilities that come with taking care of your feline companion. From feeding them a balanced diet to consistent litter training and cleanup, there are many boxes to tick when it comes to keeping your cat happy and healthy — and grooming your cat is no exception.
In some cases, this means checking and cleaning your cat’s ears to avoid common cat ear issues. Although you can take your cat to the veterinarian or pet groomer for this, it is always good to have an understanding of the process.
Read on for a complete step-by-step guide on how to clean cats’ ears at home.
What should I use to clean my cat’s ears?
Cleaning a cat’s ears is a relatively simple task that only requires a few materials — and some patience.
To begin the cleaning process, you’ll need:
- Cat ear cleaner
- Cotton swabs or gauze pads
- A light source such as a flashlight or phone light
- Treats to keep your cat happy through the cleaning process
Always use a vet-recommended cat ear cleaning solution to clean your cat’s ears. You can also find pet ear wipes and prescription-strength ear solutions for stubborn cases of feline otitis, aka the dreaded kitty ear infection. When in doubt, your vet can recommend the right product.
Some bloggers and self-proclaimed cat experts will tell you that it’s okay to use hydrogen peroxide or a vinegar solution in a pinch, but using products like these could end up causing irritation or other more serious complications.
Likewise, be cautious when using home remedies like olive oil, mineral oil, or coconut oil..
Cleaning your cat’s ears: Step-by-step
Before cleaning, always check your cat’s ears and see if there are any signs of infections, parasites, or discomfort. These include:
- Excessive head shaking or scratching of the ears
- A bad odor emitting from the ears
- Redness and visible skin irritation
- Dark patches and discharge
- Tiny black or reddish-brown spots that could be ear mites
If you notice any of these signs, visit your local veterinarian for a consultation. If it looks like just a normal build-up of wax or debris, the following steps show you how to clean your kitty’s ears from the comfort of your home.
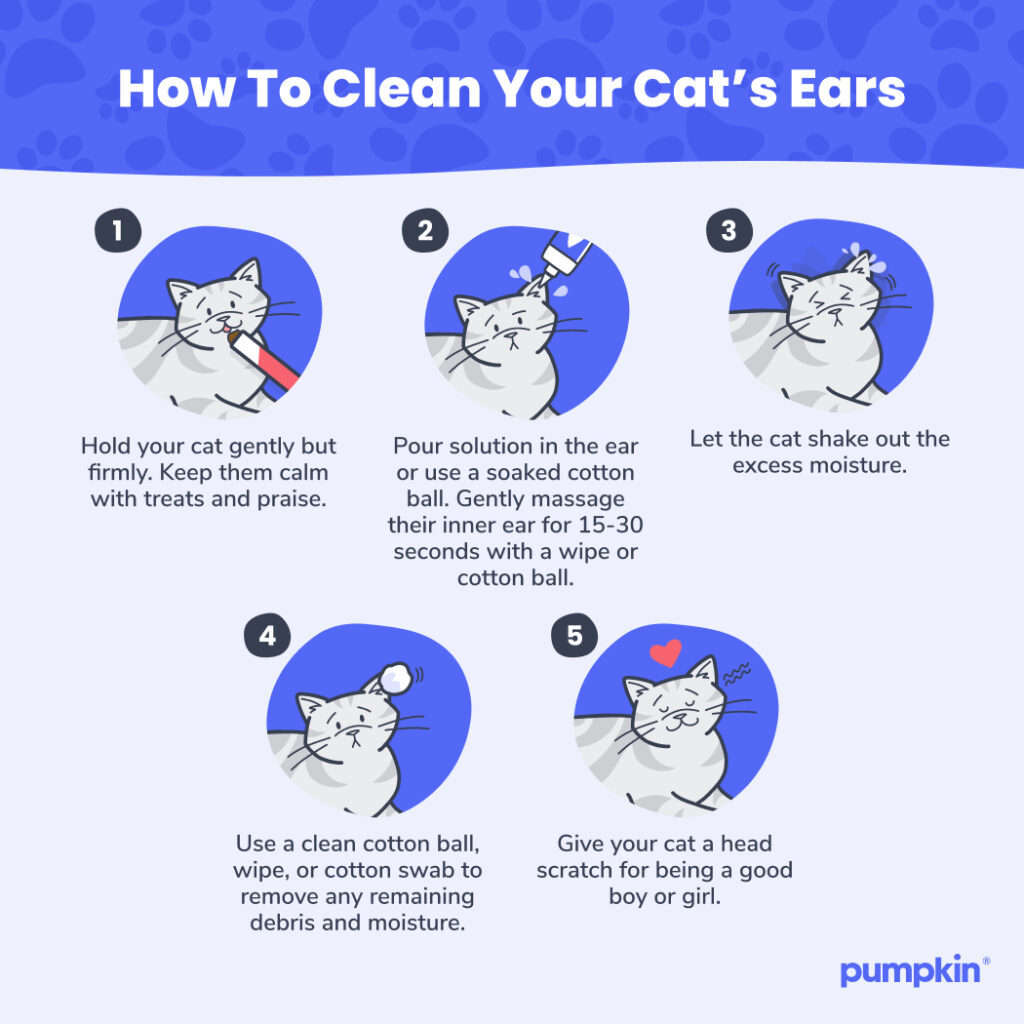
Step 1
Make sure your cat is in a familiar location, in a good mood, and in a comfortable sitting position. Keep them calm by talking to them in a soothing tone while giving them plenty of petting and encouragement. You may also need to bribe them with cat treats.
If you are having issues getting your cat under control, you can try swaddling: a tried and true method for stopping squirming. Wrapping your cat in a blanket or towel can keep them still and secure as you attempt to clean their ears.
With more rambunctious cats, you might need someone else to help hold and stabilize your cat as you clean their ears.
Step 2
Once you have your cat comfortably positioned and ready to go, gently pull their ear back and shine a light into their ear to get a better look at the situation. Check the outer and inner parts of the ear for debris, ear mites, discharge, skin irritation, or built-up wax. Make sure you don’t pull the ear too far back, as you don’t want to hurt your cat (or cause so much squirming that you’re back to square one).
Step 3
Take the ear cleaning solution and “flood,” or completely fill, the ear canal. Do not put the tip of the solution bottle inside the cat’s ear, but don’t worry about pouring too much as any excess solution will fall out when your cat shakes their head after. Alternatively, you can soak the solution into a cotton ball and use it to massage the inner ear area.
Step 4
Using a cotton swap or wipe, gently massage the base of the ear for 20-30 seconds, allowing the solution to break up any debris or wax build-up that might be in the ear canal. After, allow your cat to shake out any excess solution from their ear.
If the tip of the solution bottle does touch your cat’s ears, wipe the cap with alcohol to kill any bacteria or yeast that might linger.
Step 5
Take a clean cotton ball or gauze pad and gently remove any visible debris from the cat’s ear flap and upper ear canal. Only go as far as your finger or cotton ball/gauze pad can easily reach; do not try to force your finger or a Q-tip further inside, as this could cause damage to the ear canal or ear drum.
Once you have finished the first ear, give your cat a treat and some attention so that they can de-stress before you move on to the other ear and repeat the process.
If you are nervous or uncomfortable trying to clean your cat’s ears for the first time, get assistance from your vet or a local groomer. They’ll give you a demonstration of the process so you have more confidence in trying it the next time.
Do I really need to clean my cat’s ears?
While cats are meticulous groomers, they are unable to clean inside their ears. But ear care is important, as cats can develop a buildup of dirt, wax, or other debris in their ears.
This can cause skin irritation or infections, and in worse cases, lead to other health complications. There is also a chance that your cat could be suffering from infestations caused by mites or fleas, which will look like reddish-brown or black debris inside the ear.
Some breeds of cats might not need their ears cleaned as frequently as others, but breeds that are more prone to waxy buildup and ear infections — such as Himalayas and Persians — should be monitored closely. Regardless, all breeds should be checked regularly to ensure your cat’s ears are clean and healthy.
Add a regular ear cleaning to your kitty’s next at-home spa day using a cat-approved solution and gentle care. With clean ears, your cat’s hearing will always be sharp enough to hear the crinkles of the cat treat bag.
Even when you’re proactive with your pet’s at-home grooming, the unexpected can still happen. But that doesn’t mean an unexpected vet visit has to hurt your wallet. Learn more about how Pumpkin Cat Insurance plans can help cover the cost of eligible vet bills when your pet gets sick or hurt in the future.